


If you’re on a free plan, start by upgrading to a Proton Mail Plus plan to enable your custom domain. You can get a discount to Proton Mail by using one of my affiliate links:
- 20% off Proton Mail on a monthly plan
- 40% off Proton Mail on a yearly plan
- 30% off Proton Unlimited on a yearly plan
- 25% off Proton Duo or family on a yearly plan
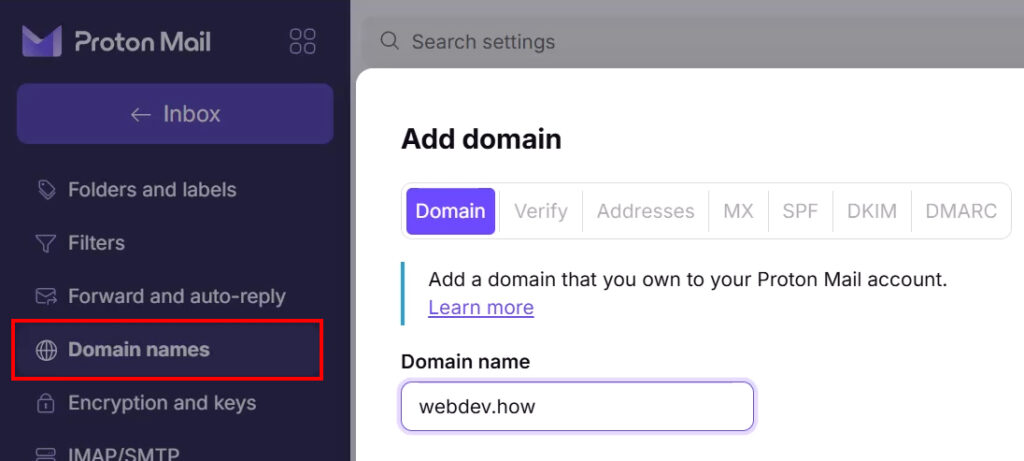
Alright let’s get started. Begin by going to:
- Settings ➝ Domain names
Then add your domain name without HTTP.
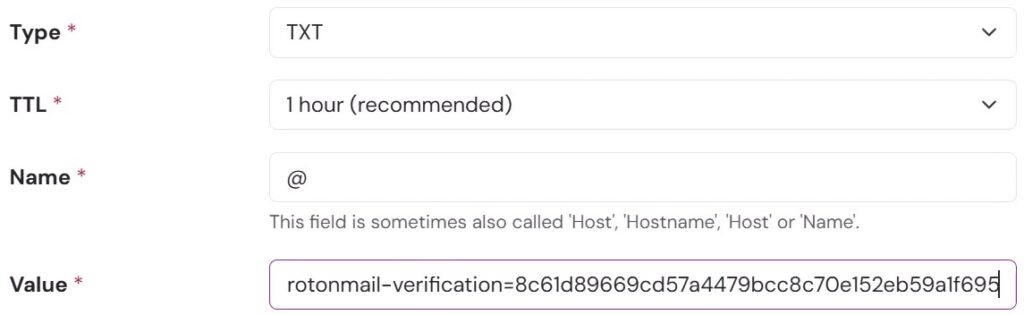
Now we will add the first DNS record which is a simple TXT record for validation. Bear in mind that this record needs to stay in your DNS settings, since Proton needs continuous validation that you own the domain.
Open up your DNS settings in your hosting provider and add the DNS record. Choose TXT and add a @ sign under name or hostname. Some hosting providers don’t need an @ sign. If in doubt, check their documentation.
Now copy over the value and create the record.
When clicking Next you’ll most likely be asked to wait an hour until the record has been registered, so grab a coffee and come back again a bit later.
Alright we’re back. You can optionally add your email addresses now, but I’ll wait till later so just click Next. Now we’ll add the two MX records.
So choose MX, set the priority to 10, paste in the value and create the record.
Repeat with the other MX record and remember to set the priority to 20 instead.
Lastly, if you have any other MX records in your DNS settings, make sure to delete them, since they will cause conflict with your Proton Mail records.

Now we’ll add the SPF record. Here it’s important to check if you already have an existing SPF record in your settings since you’re only allowed to have 1 SFP record.
- If a SFP record already exists, only copy the part saying “include:_spf.protonmail.ch” and paste that into the existing SPF record
- If you don’t already have a SPF record, then just copy the entire record into your DNS settings

Next we need to paste in 3 CNAME records.
So go ahead and choose CNAME, copy over the Name/Host and finally copy over the Value. Repeat for all three records.

Finally we have the last TXT record which is a DMARC record. Check if you already have an existing DMARC record in your DNS settings.
If not, then go ahead and choose TXT, copy the Name/Host and the value. Click “Done”.

Don’t worry if some of the statuses are red, they should become green after some time.
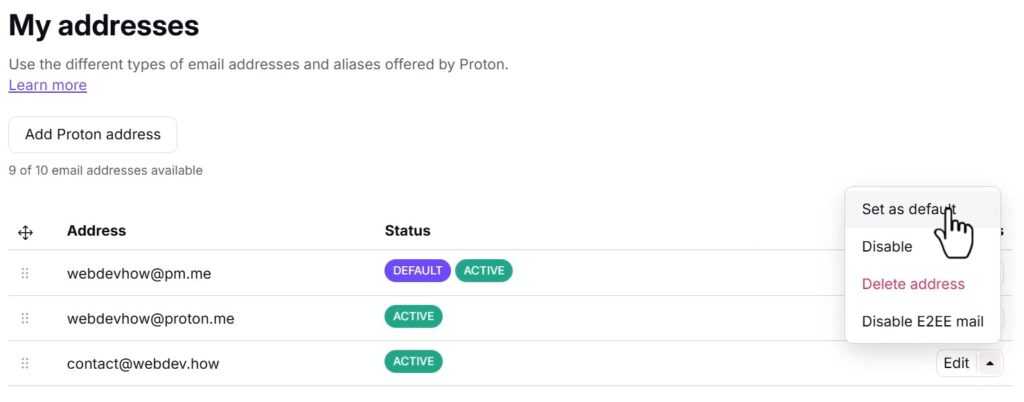
Now we can go to:
- Identity and addresses ➝ My addresses ➝ Add Proton address
Now choose your domain name and add the desired email address, in this case I’m choosing contact. Bear in mind that you get a total of 10 email addresses with a Proton Mail Plus plan.
For the display name I recommend both adding your name and company name, since this will make it easier for your contacts to search for you and your company in their inboxes.

Optionally change the default email address, which simply makes this email address the first choice when creating a new email.
Next add a signature to your email address.

Now go to your inbox and test your new email address.
And finally if you forgot to disable the “Proton Mail footer”, go ahead and disable that now.

Disclaimer: You can help support content creation. If you click some of my links, WP Explainer may get a compensation. I only partner with companies and products that I’d happily recommend to my audience.

Related tutorials
Proton 2026 review: One year after
This one year Proton review (2026) examines the concerns I had when I started vs. the reality I experience today
The best European cloud storage services
Explore big tech alternatives and leading European cloud storage providers: Proton Drive, pCloud, Internxt, Icedrive, Tresorit, Filen and kDrive

pCloud vs Proton Drive – Swiss cloud storage comparison
A comparison of the two Swiss cloud storage providers pCloud and Proton Drive. How do they stack up against each other in terms of features, privacy and price

Proton Mail vs Gmail comparison – A matter of prioritization
A side-by-side comparison of the strengths and weaknesses of the two email clients: Proton Mail and Gmail
Proton Mail review – The best private email service?
This review examines the features as well as the benefits and frustrations of switching to Proton Mail

Proton Review: Why and how I switched to Proton – Benefits and frustrations
This review examines the benefits and frustrations of switching to Proton Mail, Pass, VPN and Drive
Can not see your screen. Can’t understand some important words because of accent. Doesn’t say what TXT value should look like for root domain. Goes too fast, Still can’t set this up because of all of the above. Need to find another video that is more specific and explains what I should be looking for since there are 3 TXT values and doesn’t say which ones to choose.
Hi Karren, sorry to hear you’re having trouble with the video. Maybe you can try the written tutorial instead? Regarding the TXT values, all 3 needs to be setup in your DNS settings.